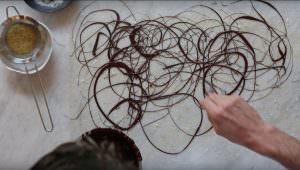
How to Make Flaky Pie Crust Video + Apple Pie Crust Recipe
A demonstration with baking tips and a delicious recipe
The art of achieving a golden, flaky pie crust can be a challenge for many bakers. In this easy pie crust baking demonstration video, I share tips for how to make a delicious apple pie with a golden, flaky crust that would make any grandmother proud. My 3-2-1 recipe is simple–it’s all about the types of ingredients, the techniques and temperature. We hope this apple pie recipe makes its way into your kitchen this season. Also, watch my mini apple pie tutorial, if you would like your guests to have their own individual pie. Cheers!
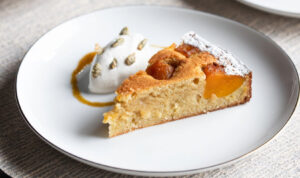
View Flaky Apple Pie Crust Recipe

Video Transcript
Today in the Jordan kitchen, I’m going to show you another recipe that people have problems with, which is flaky pie crust. And it’s actually very simple. I’m gonna show you the recipe that I’ve used for years and then explain how you can change some of the ingredients to end up with the product that you want. It’s very basic. Actually, there are three main ingredients: flour, water, and fat. Then I also have some sugar and salt that I add for flavor and also for the browning of the crust. First of all the flour, you’ll find that most recipes call for pastry flour, pastry flour is different from bread and all purpose in it has less protein. It’s going to give you a softer product, you’ll end up with a flakier, more tender crust, bread flour would give you a really tough, thick crust, which you don’t really want for a pie. Cake flour has less protein than pastry, it’ll just be too flaky to tender and crumble. I usually use all purposes because it is very similar. And it’s what I always have at home. And if you handle it right, you can still get a really flaky product. Some recipes will recommend you use bleach flour because the bleaching process takes out some protein. It’s again a little bit softer, and it’ll give you a little bit more tender crests. But because of what it does to the flavor, I still prefer to use unbleached slowly, more natural gets a little bit a better flavor. You could also do a combination of half pastry flour, half all purpose whatever you want.
But that’s the first thing that goes and so along with the dry ingredients, I’ll add my sugar and salt. The recipe I go with I call it three-two-one. That’s three cups of flour, two cups, or two cubes of butter, four ounces, one cup of water. With your dry three cups of flour, I’ll add a tablespoon of sugar, and then just about a teaspoon of salt. Your next ingredient would be your fat. There are different fats you can use. A lot of recipes will call for either large shortening or butter. Lard has a really rich flavor, probably not what you want to use for a sweet pie crust, maybe for a savory taste that would be fine. Then your two options here would be shortening or butter shortening has 100% fat, butter has 80%. Has some more solids and water and liquid in there. But I still prefer to use butter because it’s more natural, the flavors better. Shortening can also be inconsistent in the quality and the flavor side, and I never have it at home. I just kind of prefer to stay away from it. But if it’s what you prefer, because it’s 100% fat, you’ll have more flakiness in your crust. You can also do half brother and half shortening because it’s pretty neutral, it’ll take on the flavor of your butter.
I have here just regular butter, that’s eight ounces, and I cut it up and about hazelnut-sized pieces. And one of the most important things is that you keep it very cold. Same with your flour, some people will actually keep their flour in the freezer for recipes like this. And their butter should be refrigerated until you’re ready to use it. These eight ounces of butter go in with the dry ingredients. And about right here where you would turn on your mixer, I use a stand mixer on very low speed, you can start right here just for about a minute or two to break up some of your butter. The reason why you want your ingredients cold is that if they’re warm, they’re going to all kind of come together really quickly. You want them to stay separate, you want to still have some butter chunks in there when you’re done so that that’s going to create a lot of the layering that you’re looking for. Let’s go for about two minutes. This is a commercial mixer, we also use Kitchen Aid. That’s what I always use at home. It works really well. If you don’t have that you can also do it by hand, but the mixer is just much quicker.
This is about what you’re looking for in your dry before you add the liquid. You can see that the flour looks like it’s taken on some moisture because some of the pieces have worked themselves in but there’s still a good amount of large chunks of butter. You want to try and keep a lot of those in there. And I’ll show you why in a little while. This goes back into the mixer and in the three two one recipe the one is your ice water and it’s about a cup. You don’t want to add all of it at once because depending on the temperature of your flour and the humidity in the room may take more, may take less. I add the majority of it right now while the mixer is off, and then one tip the other people will tell you to do is I’ll recommend about a teaspoon of cider vinegar. And what that does is weaken the gluten, which is what makes your dough stretchy and hold together, it weakens. You actually end up with a really soft dough that’s really easy to roll out. And it gives you just a little bit of an acidic flavor. I usually don’t do that only because it’s just one extra step and one extra ingredient. And it really doesn’t make a huge difference unless you have a lot of trouble with rolling. At this point, I’ll just give it a few turns in the mixer, you want to be really careful not to over mix your dough.
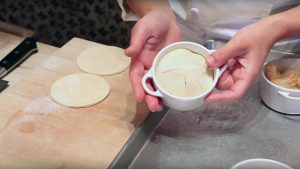
If it’s looking a little dry add about a teaspoon of water at a time, this is about what you’re looking for, it’s not going to be completely mixed and incorporated. The reason why is that you want to do that by hand, if you mix it completely in the mixer, you’re going to tend to over mix it. You finish everything by hand, you want to just lightly flour your working area. Turn out your dough, and you will have a lot of dry pieces there, that’s fine. What you want to do to finish mixing rather than needing your dough and squishing it together, you’re going to flatten it, get all your pieces, just flatten them and then fold it on itself. What that does is the layers of butter kind of layer on top of each other, and it’ll give you a really flaky crust. And you don’t need it to be totally put together or one big mass, it’s gonna feel a little loose still, this is about what you’re looking for, it’s still kind of loose, mostly put together. And you’re gonna still see some good-sized pieces of butter. That’s what you want because when it bakes, the liquid in the butter is going to evaporate and create layers between your dough. At this point is when you would cover it and refrigerate it probably for about an hour. What that does is it rests the dough so that it’s easier to roll out and also helps it to keep its shape once you’re ready to bake.
Now I’ll show you how to roll the dough that I made earlier. How to roll it, you want to flour your surface again. This is the dough that’s been resting for a couple of hours, what’s ready, you’ll see this one was cut. You can see how there are layers of butter, you can see how you can where you’ll be able to tell how flaky it will be. You flour this and flour over the top. And once I learned with rolling is you never want to move your body to roll things in a circle always roll straight ahead of you. And then if this needs to be turned, you turn the actual dough. That way you always guarantee that it’s not sticking on your surface. If you were to just leave it in one spot and keep rolling, you wouldn’t know if it was sticking, and then by the time you’re ready to lift it, it could be stuck and you could tear your dough. If you need more flour, you can put more flour on. This is how the dough is gonna look you’re still gonna see pretty good-sized pieces of butter in there, which is good, that’s what you want. Alright, at this point, this is when you would add it or start using it. I have one that’s already been rolled out here for your bottom. As you see, it’s not important for it to look perfect. On the bottom layer. You’re going to end up cutting and trimming. Right here is just the glass pan. A lot of people like it because you can see if the bottom crust is cooked evenly or not. That’s the problem that a lot of people have is that their crust bakes on top but not on the bottom. One way to help that is to cook your pie towards the bottom of your oven or even directly on the bottom of the oven. You can also use ceramic, it really conducts heat really well. You get a nice even crust, it’s just harder to see when it’s done. Or metal is really durable. Although the same problem, you can’t see when it’s done. The filling I use. You can use whatever you want. I use a cooked apple filling. I use Granny Smith because they’re nice and tart. You can always find them. And because I cook it, they hold their shape really well, so this is what I like to use. And then I just cook it on the stovetop with sugar, some lemon juice, vanilla, cinnamon, and ginger and I’ll include the recipe for you. At this point, you would just lay your top on. If it’s giving you some trouble and it’s gotten soft another thing you can do is roll it onto your rolling pin And then just roll it back over. You just want to kind of attach the top and the bottom to each other. And then all this extra, you just want to cut it off, probably about an inch away from your pie. And then, with what I have left, I like to try and put the top, tuck it in under the bottom layer. And that way you won’t see any bursting. After the pies are baked you’ll get some points where there’s more dough than others, if you feel that there’s a spot where there’s not much dough, you can get a piece of your scrap and tuck it in so that the trim looks pretty consistent all the way around. That’s one thing I try to do sometimes. Once you’ve got it folded, you just press it together and make sure it’s together and you’ve got kind of a base to work with for your shape. You can see how you have kind of a lip there.
To finish, you can really do whatever, whatever you want. A lot of people will press a fork, use a crimper, and crimp it themselves. I always crimp it myself, it’s really simple. I just put my index finger and then these two fingers around it. And you just do that all the way around your pie, of course, you have big hands so my crimps always seem to be a lot bigger than other people’s. It’s whatever you want it to look like, it really doesn’t matter. And once you have this done, you can go ahead and actually refrigerate this before you bake it for about a half-hour or if you want to freeze it for about 15 minutes. What that does is it keeps all the ingredients really cold so that when it actually goes in the oven, it’s going to hold it shaped much better. But at this point you would freeze it, we’ll just pretend that it is frozen. Now what you would want to do is an egg wash, it’s basically just an egg that’s beaten up. And you just brush it over your pie. This is going to give you a really nice shiny pie. When you’re finished, brush over the crust. And then one thing you want to do with every pie, especially fruit when it bakes a lot of liquids is going to come out. If you don’t have any vents for the air to escape from, it’s going to try and come outbursts out of your sides, your sides will get ruined, the fruit will be falling out the side. You just create some vents for the air to escape from. And you can play around and make any design you want. Just kind of open them up, make sure that they’re well ventilated. And then one thing I always do, you don’t have to do is optional, I just sprinkle about two tablespoons of sugar over the top, just for the look, and because it’s crusty and sweet. At this point, you would put it in your oven. And most ovens in general, you’d bake it about 375 I would check it after 40 minutes and it could take up to an hour depending on your oven, so keep an eye on it, you may want to rotate it if one side is brownie more than the other. If you’re using convection, you would start about 350. And again, check it after about 40 minutes, make sure it’s cooking, right.
After about an hour, this is what your pile will look like. I did have to rotate it a few times. As you can see it got dark on some edges and just moved it in the oven so that you can make sure that if your ovens are not consistent, you’ll get a nice even browning on that. If you don’t want to do something so traditional. Another option you can do is a lattice pie. And I’ll show you real quickly how you can do that. You would be using the exact same recipe as this traditional pie when you go to roll it out rather than trying to get a circle. I try to make more of a rectangular shape. And then you just cut strips out of your pie dough. This is just also half the recipe. The recipe I showed you is three-two-one, you would cut that in half one would be for your bottom one would be for your top. This is just half of that recipe. And I usually get a plate and kind of put it upside down with a piece of parchment on there. And you can start building your lattice on this. You don’t want to build it directly on the pie because with the fruit if you’re moving this around, it’s gonna get messy and discolored. You can start with one strip, sort of towards the center. And then just kind of crisscross your second strip we’ll go over just like that. And then when you get to several pieces, you just start moving them around so that you want to create that lattice-shaped it just cut them with a knife, you can eyeball it, if you want them to be perfect, you can use a ruler, then you can flip these over, add another piece, put it back. Same here you want that under. And then when you have your basic lattice shapes, you can do them thinner. If you want more detail, you can do a much thicker, if you want a different look, it really doesn’t matter, it’s up to you. The nice thing about this is it naturally has vents in there for your pie. At this point, I would stick it in the freezer probably for about 10 or 15 minutes. That way, these pieces aren’t soft, they’re not going to shift on you when you go to slide it onto your pie. And they’ll keep their shape. And that’s also the nice thing about using a plate is it gives you a little bit of a dome and about the shape that you’re looking for on your pie. And then after you pulled it out of the freezer, you would just kind of easily slide it over your pie and make the readjustments to make. And then I just kind of pinch off the ends, what you’re going to see when you’re done, again, you want to egg wash it before it goes in the oven. This is a traditional lattice pie. What’s nice is you can see the layers that you’ve created with your pie dough. That’s by handling it carefully, not over mixing. And then when I showed you mixing by hand, all that layering creates these nice layers and gives you a really flaky tender crust. And if you do a lattice pie, the baking is basically exactly the same as a traditional pie. The baking time, temperature are all the same.
I hope these tips have helped you. Again, it’s really simple, easy to remember three- two-one your basic ingredients. And if you have any questions or comments about baking, please feel free to post that for us and we’ll be happy to answer these questions.
I am confused. I thought 3-2-1 meant by weight, i.e. 360 grams of flour, 240 grams fat and 120 grams (ml) of water. 120 grams of water is about 1/2 cup. What am I missing?
I’m really looking forward to making this! But I just can’t seem to find a link that works for the recipe?! I hope someone can share the recipe for the apple filling!!!! Thank you!
The ingredients and ratios are given – 3/2/1 – they are “parts” Flour/Fat/Liquid – 3 cups of flour/2 cubes (8oz) fat/1 cup water (though I think this may be too much as it depends highly on the water content in the flour and fat that is being used. Add a little at a time. I prefer to put ice in my liquid, freeze both the flour and the fat. I like little pips of fat to create pockets that steam and create the flakes.
I’m reviewing these old videos pre-holidays, and this reminds me of my mom’s recipe. The advice is perfect, down to the keeping the butter cold due to the chemistry of the water separating from the fat in the heat, adding the flakiness. I’m smiling because her dough is the same as my mom’s biscuit recipe, besides the water becomes milk and the addition of baking powder for the rise. But those scrumptious southern buttermilk biscuits are basically this same chemistry. She did an excellent description of baker’s chemistry, which I learned from my mom. Bravo.
yummi B-)
i cnat seem to fidn the recipe for the apple pie and i looked hard
Hi Judi,
In the blog post above, it says VIEW FLAKY PIE CRUST RECIPE. You click on those words, and it takes you to: https://www.jordanwinery.com/culinary/recipes/wine-country-flaky-apple-pie.
I have cooked in restaurants for years, had a catering business for 30 years, have always been nervous about pie crust. Have tried every fraisage/rough puff/fool proof/ heaven knows what else recipe. This one is the best marriage of quality and convenience.
Thanks
Tyra
Hi Tyra,
Thank you! I’ll make sure to share this with Cristina.
Pingback: Top Blog Posts of 2016 | Jordan Winery Wine & Food
Hi, I loved the video. I tried using 1/2 the dough for a single pie crust. It just SLUMPED down into the pie plate and is a glob of goo. (argh!) Any suggestions?
I’m so stoked to have come across your recipe today. I’ve tried to make short crust pie pastry on a number of occasions, with varying results. Never been happy with the result though. That is until today, by following your easily explained directions.
I picked some apples direct from the tree on the road verge across the road, and added fresh picked blackberries from the garden before putting the top pastry on the pie.
The pastry turned out soft, flakey, absolutely delicious. I don’t see the pie lasting through the night, the family is having seconds. Thanks for your awesome lesson on making pie pastry. I will enjoy this and share it for years to come.
Thank you for sharing, Daiden! The addition of blackberries sounds delicious.
My 1st attempt at making this pie turned out pretty good. The only thing I changed was the amount of cinnamon. I used 1 tablespoon instead of 1 teaspoon. 1 teaspoon for 8 Granny Smith apples was just not enough. Everyone like the pie.
Not too bad for a 76 – year old man.
Ben
Pingback: Rise and Pie! It’s Tourtière Time | The Dad Playbook
Pingback: Bruno's Kitchen – Pecan Pie With a Sprinkle of Change
thank you for this great video. I do have a question. when I was rolling my dough it tended to spring back a little. is this maybe because my dough was too wet? I also thought that maybe my water was still too warm when I put it into my flour mix
any suggestions ?
Loved the video on pie crust… may not have done something right with the sugar and corn starch, maybe too low of heat. I salvaged that by putting the apples in a colander and getting the liquid. I reheated the liquid till it was thick! Combined both when the sauce was thick. YUMMY. Hope this helps if anyone has had this issue. Thanks for some great information! PS:) DELICIOUS RECIPE
Thanks for sharing your tip.
Cristina,
I would like to thank you for this pie crust recipe. I’ve struggled with pie crusts since I first started cooking and frankly never knew what a real pie crust was supposed to taste and look like. I watched your video and followed your recipe and Bam! The first time out of the shoot it turned out perfect. I’ve been told for years that you can’t make a pie crust with a stand mixer and you proved them wrong and I’m so appreciative of your tutoring skills in the kitchen. Thank you!
Leo
I will pass your kind note to Cristina. Thanks for taking the time to write.
Hi Jordan, I would like to make a cherry, and apple pie ahead of time and bake them on thanksgiving in the firehouse. Do I just freeze, then pull them out, egg wash then bake? If so what temp? and how long?
Thanks,
Dave.
Please put me on your blog list.
I’m a little confused where the 3-2-1 comes in…I see 3 cups flour (12.75 ounces), 8 ounces of butter, and 8 ounces of water. Her pie obviously turns out great but for the 3-2-1 why wouldn’t the water be closer to 4 ounces? Am I doing my math wrong? I’m trying the recipe out today and so far so good!
The 3-2-1 is 3 cups of flour, 2 cubes (8 oz) of butter, and 1 cup of water. The only reason I know is because I watched her YouTube video. 🙂 https://youtu.be/FC87gs1V-Gc
I absolutely love this recipe for the crust. I made a pumpkin pie and will definitely make the apple pie next. The video was very informative and taught me a lot. Thank you. Looking forward to the next lesson.
Hi, beautiful video!
I enjoy how you talk. No big fuss and fake annoying smiles like other people on youtube.
I am trying to make couple peach pies and freeze them for a longer period. Is that possible?
Tank you
I made this pie Christmas Holiday 2014 I loved it, the best. Friends and Family could not stop talking about it, especially Flaky Crust.
My family wants it every year for holiday.
Thank you so much and my God Bless you.
Hi there, Christina mentioned freezing the dough before baking so that it retains its’ shape better, may I know if the dough needs to be wrapped for freezing or you can just chuck it in as it is without any wrapping? Thanks!
I can cook just about anything really well … except pie crust … despite years of trying. I finally resorted to You Tube. This video taught me so much that is missing from the recipes I’ve used. 3-2-1 for me! (I can’t imagine how a pie crust recipe can work with just 3 tsp of water. Definitely explains the sand texture of my dough and difficulty rolling.) I especially liked Lisa’s balance between science and simple “don’t be too fussy” technique. Can’t wait to bake a pie tomorrow with fresh rhubarb from my garden. Thanks so much!
This is great to hear. I’ll let Cristina know. Thanks so much!
Note to myself for next time. The apples cook much faster than I thought. They’re a little mushy. Watch them carefully. Wish the recipe would have given an approximate time frame.
Hi William,
Sorry for the delay in responding. An approximate cooking time is 7-10 min depending on how thick the apples have been cut. If cut thin it could even be 4-5 min.
This will be my first time making pie crust and it will be for a strawberry feeling. Would you tell me temperature of oven and how long to bake, if I want to bake just bottom pie crust by itself?
Hi Jane,
Sorry for the delay in responding. We recommend baking at 425*F for a single shell. Make sure your pie shell is very cold before baking and perhaps line the shell with parchment and beans to ensure the pie crust doesn’t sink too much while cooking. You can take the beans out once it seems like the shell is stable; approximately 15-20 minutes.
Finally nailed this one, the best pie crust I have ever made! Also her cooked apple filling is a revelation.
I love Cristina’s videos, I really hope she’s going to put some more out soon!
I love the video and the recipe! It helped me so much to make my first Apple Pie. I mistakenly put not enough butter in the dough (I’m German and still get little confused with the ounces etc.) But nevertheless the pie turned out very delicious! Thank you!
Can you tell what depth the 9 inch pie pan should be? Is there a standard depth? I have heard range from 1-1/4 to 2″
also makes big difference in amount for filler right?
1-1/4 inch deep
First time making this pie crust ,,I am going to put a cold filling in it after crust is baked , I am going to bake at 450 deg for 10 to 15 min hope all go’s well ,dough is in the ice box chilling right now , will try to roll out in 30 min . Thanks for sharing recipe per video really helped ,Gregory
Well I must say it is a flaky pie crust ,Not the flake I was looking for , good recipe
Hi Gregory,
I’m glad you enjoyed the recipe and video. We have a few more videos from Cristina debuting this spring and summer. Stay tuned.
I can’t wait to try out this recipe 🙂 being that my first pie crust wasn’t all that great. I’ll be making 2 pies and they don’t require a top crust. How many ounces does each crust need to be? Or is just approximate and I can just cut it in half?
Hi Ashley,
We were closed for the holidays, so sorry for the delayed response. Just cut the recipe by 1/3 if you don’t need the top. You might have a little bit of crust left.
I have been on a seach for the perfect pie crust….This is it…easy to make perfect everytime….Thank you soooo much
She needs to sound a little mire upbeat in her voice…too monotone.
Also…get that hair outta your face!
Cristina prefers to focus on her baking skills, but we’ll be sure to give her your styling tips. Thanks.
Absolutely nothing wrong with her voice and nothing wrong with her hair. I liked the casual but very informative and professional tone. A welcome change from the Food Network Giada’s of the world of cleavage and fake enthusiasm. Good video.
Thank you, Kate! I’ll pass your note to Cristina.
You must a millennial — classic in troll and trolling. Do not wound another to heal yourself! What would ever possess you to make such a rotten comment like that? You’re a piece of work. May we suggest an ‘uptown’ at the end of every sentence?
REALLY?
What do you think this is?…AMERICAS FIRST TOP MODEL?
If you don’t like the sound or level of her voice, or how her bangs look.. find a video you can stomach.
She was nice enough to post this video for those of us that aren’t as talented in the kitchen as she is.
The recipe was AMAZING and I’ve tried many crusts.
This is not a forum for comments like yours.
But I’m sure if look around, you’ll find one.
I love this recipe. I appreciate the time she took to teach me how to make this wonderful crust.
And I thank her.
Hi , i am from Algeria and i’ve searched for a pie dough recipe for forever, i like yours but i need the ingredients in Grams please (metric system), i am not so sure about the flour amount.
Google conversions standard to metric.
Excellent video and the explanation is wonderful !!!!!!!!!!!
Thanks. Glad you enjoyed it.
Great video on the pie crust! I followed the recipe and my crust came out extremely hard, especially the bottom. Any idea why that would have happened? Did I not roll it thin enough?
Hi Jay,
The only thing we can think of is that the dough could have been over mixed or that the oven temp was not hot enough and it baked too slow. And make sure the dough has been refrigerated at least an hour before rolling and baking….
Hope this helps.
OMG I made my first pie crust!!! Great tutorial and my pie came out fantastic. Thank you very much and you have no idea how excited I am. 🙂
That’s great to hear. Thanks, Bree!
one tablespoon you add with the flour and salt,
and the other two for the top of the pie.
Could I use this pie crust for any other pies like a pecan pie?
Absolutely.
Pingback: Amerikan Usûlü Elmalı Turta | Küçük Hanımın Elinden
Excellent tutorial. I followed by the book, Wonderful tut! Loved it.
Awesome, I’m going to make this for Thanksgiving. I noticed a typo, though. The filling ingredients call for 1 tablespoon of sugar but the instructions (#3) call for 3 tablespoons of sugar. Clarification?
Hi Jordan,
Glad you enjoyed the video. We re-checked the video and the recipe and both call for 1 tablespoon of sugar. Are you sure you heard 3?
Thanks,
Lisa
Hi Jordan and Lisa. In the recipe, the dough calls for 1 tablespoon of sugar. The filling has two parts. One part includes the apples, 3/4 cup sugar, both flavorings and all spices. The 2nd part includes the cornstarch and 3 tablespoons of sugar. These two filling mixtures will be combined together. Could be where the misunderstanding occurs. Not criticizing anyone, but all recipes should be read very carefully. This is indeed a wonderful recipe! The pie in picture looks wonderful! I will be making this apple pie recipe very soon, and will be using the crust recipe (which is what I was searching for today) to make a coconut custard pie. Thank you!!
The 3 tablespoons of sugar is to mix with the starch that you use to thicken the filling. The one tablespoon is part of the crust. You add it to the flour along with the salt before you add the butter (or shortening)
Excellent tutorial! Some wonderful tips, and your estate baker did a great job demonstrating while simultaneously presenting clear, helpful explanations to really understand why certain ingredients and steps are recommended. I’m thinking apple pie for Thanksgiving dessert!
Glad you enjoyed the video!